What is an off-canvas menu? It’s essentially a navigation element that remains hidden until triggered by user interaction, keeping your main interface clean while providing additional options when needed. With Divi 5, we can now create both global canvases for website-level menus and popups, as well as local canvases for specific posts. Additionally, these canvases function as staging areas where you can safely experiment with new ideas before making them live. Furthermore, Divi menus have evolved significantly with the introduction of Canvas Portal modules, which allow us to inject canvas content into specific page areas.
In this step-by-step guide, we’ll explore how to build perfect off-canvas navigation menus that utilize Divi 5’s Flexbox controls, Interactions, and responsive settings. We’ll also show you how to fine-tune their behavior across different device breakpoints, ensuring your off-canvas menu examples work flawlessly on all screen sizes.
Understanding Off-Canvas Menus in Divi 5
Canvases provide the foundation for creating dynamic content in Divi 5. These versatile elements serve as the backbone for modern website navigation and interactive components that enhance user experience without cluttering your main layout.
What is an off-canvas menu and how it works
An off-canvas menu operates as a hidden navigation component that remains concealed from view until activated through user interaction. In Divi 5, these menus function within dedicated spaces called canvases that operate separately from your primary content [1]. Rather than constantly occupying screen real estate, off-canvas navigation menus stay neatly tucked away, appearing only when summoned.
The mechanism behind these menus relies on Divi’s interaction builder, which creates trigger events that control the visibility of canvas elements. When a user clicks a menu icon or performs another specified action, the interaction toggles the visibility of the hidden menu component. This approach maintains a clean interface by keeping supplementary navigation elements out of sight until needed.
Differences between global and local canvases
Divi 5 offers two canvas types that serve different purposes:
- Global canvases – These website-level components can be accessed from any page or template [1]. Global canvases prove particularly valuable for consistent navigation elements that appear throughout your site.
- Local canvases – These are specific to individual posts [1], allowing for unique off-canvas content tailored to particular pages.
Both types remain detached from your main content in the builder interface, keeping your workspace organized. However, canvases targeted by interactions are automatically appended to the main canvas when viewed on the front end [1], ensuring they function properly while staying out of your way during the design process.
Use cases: popups, mega menus, and side panels
The versatility of Divi’s canvas system enables numerous practical applications:
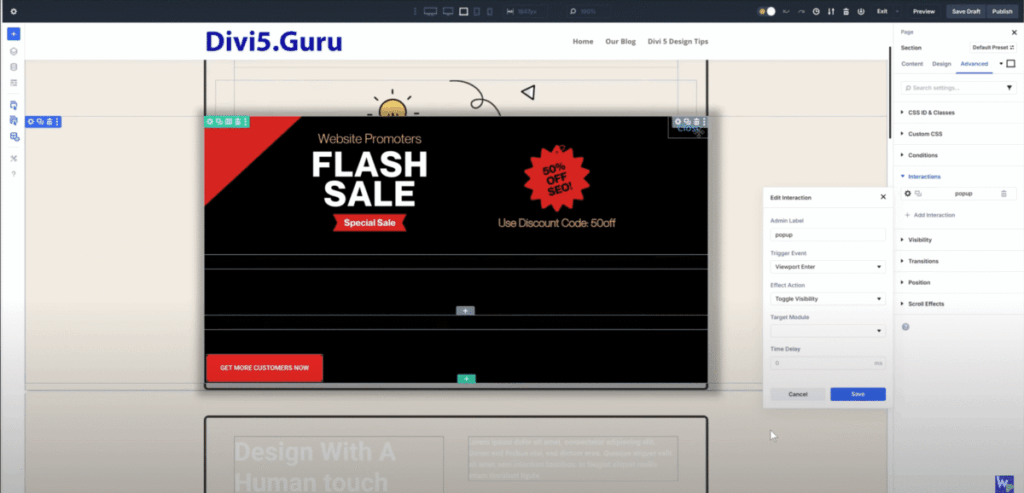
- Popup notifications – Create viewport-triggered popups that appear as users scroll down your page [1].
- Mega menus – Develop expansive dropdown navigation menus that appear when hovering over header links [1].
- Side panels – Design slide-in menus activated by click events [1].
Moreover, Divi 5 introduces the Canvas Portal module, which injects canvas content into specific areas of your page [1]. This capability proves particularly useful for precise positioning of off-canvas elements relative to their triggers.
The interaction builder supports both click and scroll-based triggers, allowing for diverse menu activation methods. For instance, you might create a menu icon that toggles a side panel or implement scroll-based triggers that automatically display navigation options at certain page positions [1].
Creating and Managing Canvases in the Builder
Working with canvases in Divi 5 requires understanding the dedicated interface tools that help you manage these detached workspaces. The canvas system gives you powerful options for creating off-canvas menus and interactive content while keeping your main design area uncluttered.
Accessing the canvas dropdown in Divi 5
Upon opening the Divi 5 Visual Builder, you’ll immediately notice a new canvas dropdown menu positioned at the top of the interface. This central control point allows you to efficiently manage all aspects of your canvases. From this dropdown, you can quickly switch between different canvases you’ve created or access functions to create new ones. This intuitive placement ensures you’re never more than a click away from accessing your off-canvas menu components.
Creating a new canvas for off-canvas content
To add a new canvas, simply use the canvas dropdown menu and select the option to create one. Initially, this creates a blank detached workspace where you can design your off-canvas content. Notably, you can mark specific canvases as global, making them accessible across multiple pages or templates—ideal for site-wide off-canvas navigation menus. Additionally, the dropdown lets you choose whether to automatically append particular canvases to your post content when viewed on the front end.
Switching between canvases using grid view
For a more visual approach to canvas management, Divi 5 offers a canvas grid view that displays thumbnails of all your canvases. This overview makes it straightforward to:
- Quickly jump between different canvases
- Right-click any canvas to access edit, duplicate, export, or delete functions
- Visually organize your work across multiple detached workspaces
This visual management system proves especially useful when working with complex off-canvas navigation menu structures that span multiple canvases.
Setting a canvas as the main canvas
Interestingly, Divi 5 allows you to designate any canvas as the main canvas for your page. This flexible approach enables you to develop different page variations simultaneously within the same builder session. Once you’ve finalized a design, you can set it live by assigning it as the main canvas—all without needing to manage separate library layouts. This capability streamlines the process of creating and testing alternative off-canvas menu designs before implementing them.
Building Interactive Off-Canvas Menus
The power of Divi’s off-canvas menus comes alive through its robust Interaction Builder. This feature lets you create dynamic navigation experiences that respond intelligently to user actions.
Using the Interaction Builder to trigger canvas content
Divi 5’s Interaction Builder enables you to target elements residing on other canvases. This means you can design hidden sections for menus on dedicated canvases yet control them from your main canvas. The Interaction Builder appears in the advanced tab of all elements, where clicking the “add interaction” button opens the interaction editor for configuration.
Creating click and scroll-based interactions
You can create two primary types of interactions:
- Click-based triggers – Add icons or buttons with data attributes that toggle menu visibility when clicked
- Scroll-based (viewport) triggers – Create interactions that automatically display menus when users reach specific scroll positions
For example, you might add a click interaction to a header icon that toggles an off-canvas menu section, or implement viewport interactions that display promotional popups as users scroll down the page.
Animating hidden sections with Divi’s animation settings
To create smooth transitions for your off-canvas menu:
- Set up the “Toggle Visibility” effect in the Interaction Editor
- Apply Divi’s animation settings to the menu section itself
- Choose animation types like “Fade” or slide effects
- Adjust animation duration and delay to perfect the motion
Best practices for off canvas navigation menu design
Firstly, organize menu items by frequency of use, placing common destinations at the top. Secondly, use visual cues like color to indicate navigation levels. Lastly, ensure your off-canvas menu responds appropriately across all device sizes by utilizing Divi’s Customizable Responsive Breakpoints.
Injecting Menus with the Canvas Portal Module
The Canvas Portal module stands as a key innovation in Divi 5’s off-canvas menu system, allowing for precise control over where your hidden content appears.
How the Canvas Portal module works
The Canvas Portal functions as a connector between canvases, enabling you to inject content from one canvas directly into specific locations within your layout [2]. Unlike traditional implementations, this module pulls in content you’ve built on a separate canvas (such as a mega menu) and places it exactly where needed in your main design.
Injecting canvas content into headers or text modules
Once you’ve created your off-canvas menu on its own canvas, you can strategically place Canvas Portal modules throughout your site. Specifically, these portals can be inserted inside text modules containing navigation links or within header elements [1]. Upon configuring the portal, it automatically imports the designated canvas content.
Positioning off-canvas menus relative to triggers
The true power of this approach becomes apparent through positioning flexibility. Instead of menus appearing at fixed screen positions, they can emerge precisely relative to the triggering element [2]. Consequently, your mega menu might appear directly beneath a navigation link that activates it, creating intuitive user experiences.
Using nested elements for precise placement
Divi 5’s nested module capability proves invaluable with Canvas Portals. Since every module now acts as a potential container [3], you can place portals inside other elements with remarkable precision. This structure enables complex menu positioning without requiring custom code [3].
Conclusion
Off-canvas menus stand as game-changers for Divi 5 websites, offering cleaner interfaces while maintaining full navigation functionality. Throughout this guide, we explored how these hidden navigation elements work within Divi’s canvas system to enhance user experience without cluttering your designs.
Divi 5’s dual canvas approach—global for site-wide implementation and local for page-specific content—gives you remarkable flexibility when planning your website navigation structure. Most importantly, the dedicated canvas dropdown makes management straightforward, allowing quick switches between different menu designs through the intuitive grid view.
The Interaction Builder truly transforms static menus into dynamic elements that respond intelligently to user behavior. Whether you prefer click-based triggers or scroll-activated menus, these tools let you craft navigation experiences tailored to your visitors’ needs. Additionally, animation settings ensure smooth transitions that feel polished and professional.
Perhaps the most powerful feature we covered, the Canvas Portal module, changes how you can position off-canvas elements. This breakthrough module enables precise placement relative to trigger elements, creating intuitive connections between navigation triggers and their corresponding menus.
You now have everything needed to implement sophisticated off-canvas navigation systems on your Divi 5 websites. These techniques will undoubtedly elevate your designs while maintaining optimal user experience across all devices. We hope this step-by-step guide helps you take full advantage of Divi 5’s robust canvas capabilities for your next project!
References
[1] – https://www.elegantthemes.com/blog/?p=305251
[2] – https://help.elegantthemes.com/en/articles/13249775-divi-5-canvases-off-canvas-menus-popups-canvas-portals
[3] – https://help.elegantthemes.com/en/articles/12672584-nested-module-in-divi-5